How to Use Photo Mode in Red Dead Redemption 2
Photo mode is a common feature in many AAA titles nowadays, and Red Dead Redemption 2 is no different. With its stunning panoramic views of the wild west, varied wildlife, and gunslingin’ action, there’s a ton that you’ll no doubt want to capture with the Red Dead Redemption 2 photo mode. Problem is, though, it’s tucked away a little bit and it’s not the easiest thing for everyone to find. Here’s how to use photo mode in Red Dead Redemption 2. We’ve also broken down where to find your photos, and all the different settings you have at your disposal, too.
Opening Photo Mode
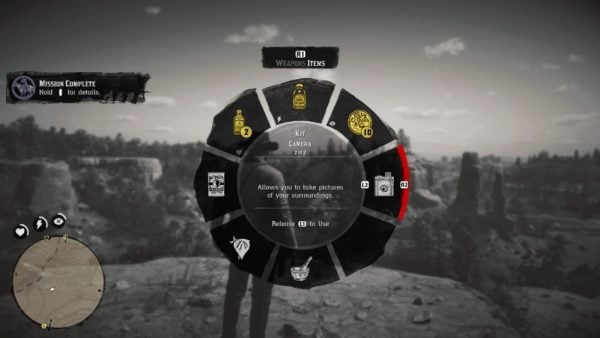
In order to actually use photo mode in Red Dead Redemption 2, you’ll first need to get your hands on the Camera. You can find this within your Items menu, by holding down the L1 (LB) button, and using R1 (RB) to tab from Weapons to Items. You’ll then want to use the right analog stick to select the segment that has your Binoculars in it, and then use R2 (RT) to tab over to the camera. Now, let go of L1 (LB), and Arthur will whip out a cool, old-school portable camera to snap some shots with.

It’s worth noting, however, that you’ll need to play through the opening section of Red Dead Redemption 2 before you’ll gain access to the camera, so you’ll want to wait until you’ve set up your first proper camp out of the snow before trying this.
Now that you’ve got the camera out in Red Dead Redemption 2, you have a number of different settings and options to play around with.
How to Use Different Photo Mode Settings
The first and most obvious option is the way that anyone back in the wild west era of history would realistically use a camera. No, no, not selfie mode, the normal way! By pressing L2 (LT) once you’ve got your camera out, Arthur will look down the lens and everything will get a vintage-looking filter applied. You can use Focus Lock to ensure the subject of your image isn’t blurred by pressing L1 (LB), zoom in and out using the left analog stick, and of course, take the photo itself by pressing R2 (RT) when you’re happy with the shot.
You aren’t given the option to pan around your surroundings here. Instead, Red Dead Redemption 2’s photo mode opts to feel realistic, as if Arthur is taking the photos himself in handheld mode.
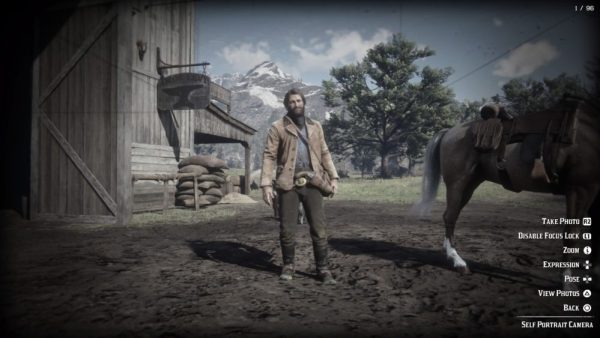
The other option you have available to you in Red Dead Redemption 2 photo mode is the self-portrait option. Yes, there’s a selfie mode, though this time it seems as though Arthur passes his precious camera over to someone else to snap a shot of him.
Here, you’ve got once again the same focus lock, zoom, and take photo options assigned to the same inputs as before. On top of that, however, you’re able to change Arthur’s expression by using up and down on the d-pad, and his pose by using left and right on the d-pad. Once you’re happy with the way he’s looking, simply use R2 (RT for your Xbox One owners) to snap the shot.

You can then use Triangle (Y) to quickly access and view photos that you take within the game’s photo mode. However, if you’re wanting to look through your snaps at a later date, there’s another way you can access this too.
How to View Photos You Take in Photo Mode
Any photos you do take in the Red Dead Redemption 2 photo mode can be accessed by pressing Triangle on PS4 or Y on Xbox One while in the mode. This will automatically take you to the Rockstar Social Club where all of your photos are stores. This can also be accessed from the main menu by selecting the Social Club option after pressing the Options button on PS4 or Menu button on Xbox One.
You’ll then see all of the photos you’ve taken and can select one to get a closer view of it. When in this view, you can hide info by pressing Square on PS4 or X on Xbox One, and then screenshot it through your system’s DVR to add it to your hard-drive, should you want to.
Is There a Photo Mode Trophy or Achievement?
As nice and easy as a photo mode trophy or achievement would have been in Red Dead Redemption 2, alas this isn’t the case. You can always make the trophy pop/ achievement bink noise yourself when you snap one, though… if you really wanted to. Don’t worry, we won’t judge!
That’s all there is you need to know on the Red Dead Redemption 2 photo mode. We’ll be sure to update this guide with any additional information, tips, or tricks that you may need to master this mode.
We’ve got guides on your bounty, how to get money fast, hunting, and fishing, too, should you need a hand.
For more tips, guides, and walkthroughs for your adventure in the wild west, be sure to check out our Red Dead Redemption 2 guide wiki.