In this guide, we’ll run you through the procedure to create a flight plan in Microsoft Flight Simulator.
One of the most important steps for a successful flight is to design a flight plan that will bring you to point A to point B quickly and efficiently. If you simply want to fly around aimlessly, you don’t need it, but reaching a specific destination demands a planning stage.
How to Create a Flight Plan in Microsoft Flight Simulator
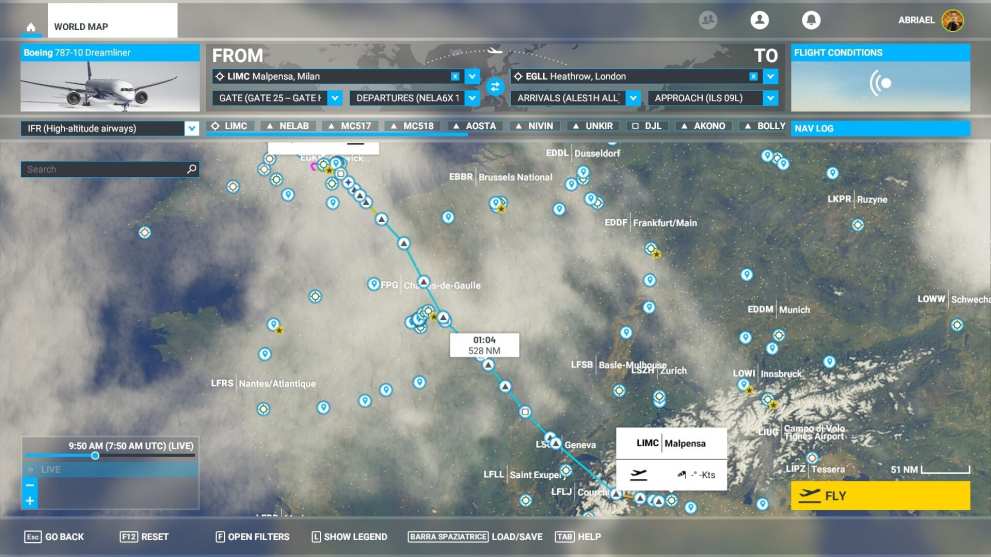
First of all go to the World Map from the Welcome Menu. Select your aircraft first so that your range will be visualized on the map and you don’t risk picking an airport too far off from your departure.
Then you have to select a “From” airport and a “To” one. You can either click on the boxes and scoll, type the name of the city, or the ICAO code.
You can also left click directly on an airport on the map and then select either “set as departure” and “set as destination.”
In the drop down menus under your departure airport you’ll be able to select the runway, gate, or parking apron you want to start from. If you select a runway, your aircraft will already be powered and ready to take off.
If you select a gate or parking apron, you’ll have to perform the while starting procedure from cold and dark. You can also make this selection directly from the map.
In the menu under your arrival airport you can perform the same selection. If you don’t select a gate or parking, the simulator will assign you one automatically upon leaving the runway after landing. Do keep in mind that this selection is valid only for VFR flights.
Just under the icon of your selected aircraft a drop down menu will appear allowing you to select a direct GPS course (which is simply a straight line and not recommended for anything but the shortest flights), a VOR to VOR visual route that will guide you through a series of waypoints, and two kinds of instrumental routes: low-altitude airways and high-altitude airways.
Those are pretty self-explanatory and you should likely use them if you plan on using the autopilot to navigate.
Low-altitude airways are better for smaller aircraft and for short-range trips with all aircraft while high-altitude airways are better for long-range flights.
You shouldn’t select high-altitude airways if you’re flying with something like a Cessna, because it simply doesn’t have the power to get to 40,000 feet. Those are suitable for airliners and business jets.
Once you select your airway type (this doesn’t apply to direct GPS and VOR to VOR routes), Microsoft Flight Simulator will automatically select a route for you, but you aren’t done yet.
Under your departure airport, a new drop-down menu has appeared. You need to use it to select your departure route. You should pick one corresponding to the runway you want and ideally in the right direction to preserve fuel.
Under your arrival airport you have two selections to make, which are your arrival route and your final approach. Final approaches are marked with the runway (which should match the one you want to land on) and the type of approach equipment you want to use, for instance ILS, RNAV, etcetera.

Once you’re done, you can click on Nav Log to see every single waypoint and change your cruising altitude if you want to. Again, please don’t select a cruising altitude that your aircraft may struggle to reach.
You can click on any waypoint to remove it. You can also click on “Open Filters” at the bottom and scroll down to toggle “Navaids” and “Fix & RNAV Position Report” on to show more waypoints on the map. This will allow you to left-click on them to add them manually to your route if there is a specific location that you want to absolutely overfly.
Once you press “FLY” the flight plan will automatically be loaded in your flight computer. “Veteran” flight simulation enthusiast often enjoy manually punching it in from the cockpit, but we’ll explain that in another guide down the line.
How to Set a Flight Plan in Microsoft Flight Simulator
- Select your aircraft.
- Select your “from” and “to” airports.
- Select your initial and final positions (optional).
- Select your flight plan type (VFR, IFR, Airways, etc).
- If IFR select Departure route, Arrival route, and Approach.
- Tweak your cruising altitude (optional)
- Add or remove waypzoints (optional).
- Press “FLY”
If you want to learn more about Microsoft Flight Simulator, you can check out our review that will tell you everything you need to know about Asobo Studio’s new and awesome game.
Microsoft Flight Simulator is already available for Windows 10 and Steam. An Xbox version is also planned for the future but has no release date for the moment.
That’s all you need to know about reating a flight plan in Microsoft Flight Simulator. You can also check out our growing guide wiki that includes more information that can help you get started.
